Are you wondering how to design your own furniture, create custom furniture online, or build furniture online? In today’s digital age, the ability to design and create your own custom furniture has become more accessible than ever. With the rise of online resources and the availability of unique materials, individuals now have the opportunity to craft bespoke pieces that reflect their personal style and vision. One particularly popular choice for custom furniture design is the use of epoxy resin to create stunning wood tables with intricate designs. In this comprehensive guide, we will explore the process of designing and building your own epoxy wood table, from selecting the right wood to applying finishing touches.
How To Design Your Own Furniture With a Pro Custom Furniture Maker
When it comes to designing your own furniture, seeking the expertise of a professional custom furniture maker can be invaluable. These skilled artisans possess a deep understanding of woodworking techniques, material properties, and design principles. Collaborating with a pro can provide insight into the nuances of furniture design, helping you refine your ideas and bring them to life with precision and craftsmanship.
Custom furniture online makers can offer guidance on wood selection, joinery methods, and finishing options. They can also assist in incorporating epoxy resin into your designs, ensuring that it enhances the overall aesthetic and durability of the piece. By leveraging their experience and knowledge, you can elevate your DIY furniture projects and create truly exceptional pieces for your home or business.
If you are considering working with a custom furniture maker, it’s essential to communicate your vision clearly and openly. Discuss your design preferences, functional requirements, and any specific features you wish to include in your furniture. By fostering a collaborative relationship, you can benefit from the expertise of a professional while still infusing your personal creativity into the project.
Embarking on a journey to build furniture online is an exciting endeavor that allows you to unleash your creativity and showcase your unique style. Whether you are a seasoned DIY enthusiast or a newcomer to woodworking, the process of creating custom furniture begins with a clear vision and a solid plan. Before diving into the technical aspects of construction, take the time to conceptualize your design, gather inspiration, and establish a clear understanding of your project goals.
Consider the purpose of the furniture piece you intend to create. Are you aiming to design a statement dining table, a functional coffee table, or a captivating console table? Understanding the intended use of the furniture will guide your design decisions and help you tailor the dimensions, materials, and features to suit its specific role in your space.
Furthermore, take inspiration from various sources such as architectural designs, nature, art, and other furniture pieces. Collecting images, sketches, and material samples can aid in shaping your design concept and refining the visual details of your custom furniture.
As you delve into the design process, keep in mind the importance of functionality and ergonomics. While aesthetics play a significant role in furniture design, ensuring that your piece is comfortable, practical, and suitable for its intended use is paramount. Striking a balance between form and function will result in furniture that not only looks exceptional but also serves its purpose effectively.
Choosing the Right Wood for Your Custom Furniture
The selection of wood is a crucial step in the creation of custom furniture, as it significantly influences the appearance, durability, and character of the finished piece. When designing an epoxy wood table, choosing the right type of wood is essential for achieving the desired aesthetic and structural integrity.
Types of Wood for Epoxy Wood Tables
- Hardwoods: Hardwoods such as oak, walnut, maple, and cherry are popular choices for crafting durable and visually appealing furniture. Their dense nature and distinct grain patterns make them ideal for showcasing the intricate designs and vibrant colors of epoxy resin.
- Exotic Woods: For those seeking a more distinctive and luxurious look, exotic woods like teak, mahogany, and rosewood offer unique grain patterns and rich hues that can complement the vibrant swirls and patterns of epoxy resin.
- Reclaimed Wood: Embracing sustainability and character, reclaimed wood from old barns, factories, or warehouses adds a sense of history and charm to furniture pieces. The weathered patina and imperfections of reclaimed wood can create a striking contrast when paired with epoxy resin.
When selecting wood for your epoxy wood table, consider factors such as color, grain pattern, hardness, and dimensional stability. Additionally, ensure that the wood is properly dried and acclimated to prevent warping or cracking after the epoxy resin is applied.
| Types of Wood for Epoxy Wood Tables | Description |
| Hardwoods | Oak, walnut, maple, and cherry are dense, visually appealing, and ideal for showcasing epoxy resin designs. |
| Exotic Woods | Teak, mahogany, and rosewood offer unique grain patterns and rich hues that complement epoxy resin designs for a distinctive look. |
| Reclaimed Wood | Weathered patina and imperfections in reclaimed wood from old structures provide a sense of history and contrast when paired with epoxy resin. |
Exploring Epoxy Resin Techniques for Unique Table Designs
Epoxy resin is a versatile and captivating material that has gained popularity in the realm of furniture design. Its transparent, glossy finish and ability to encapsulate various elements make it an excellent choice for creating one-of-a-kind table surfaces. By incorporating epoxy resin into your furniture designs, you can achieve stunning visual effects, protect the underlying wood, and add a touch of modern elegance to your pieces.
Epoxy Resin Design Options
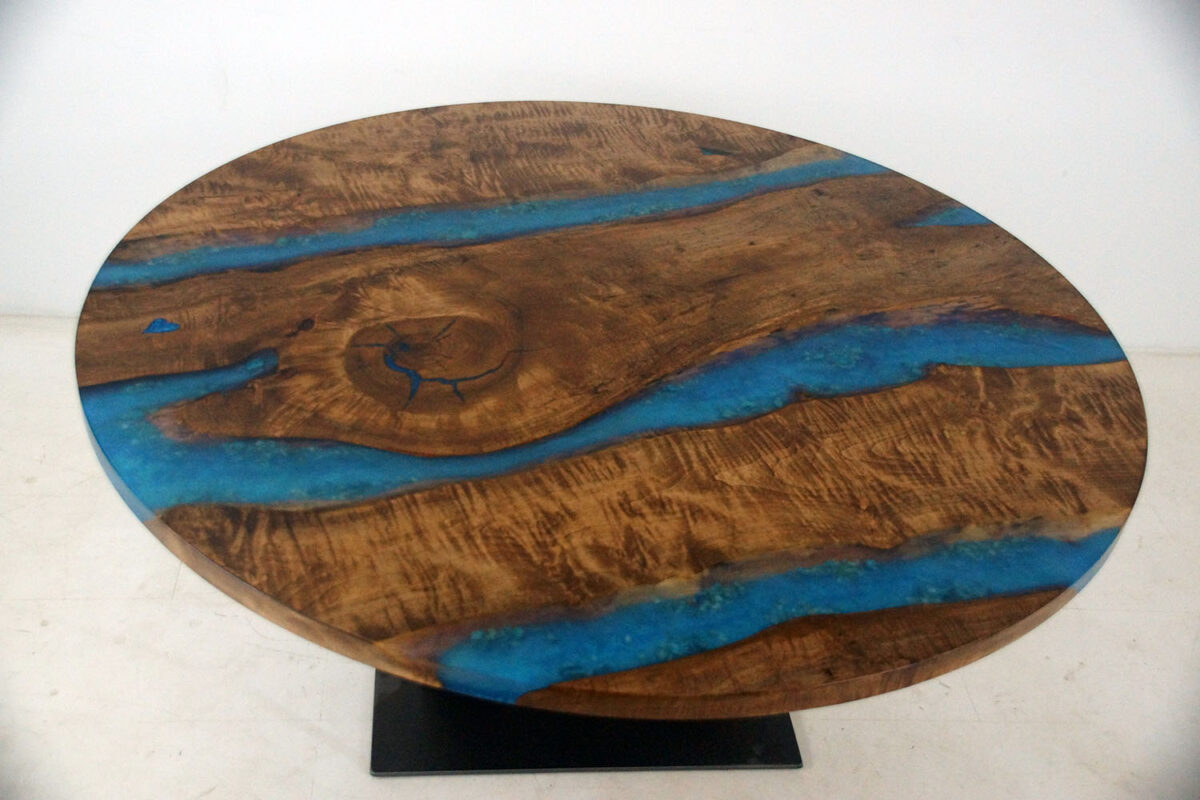
- River Tables: River tables, characterized by their incorporation of epoxy resin to simulate flowing water, have become a prominent trend in custom furniture design. The resin is poured into a recessed area of the wood, creating a mesmerizing “river” that meanders through the table’s surface.
- Geode Tables: Inspired by the natural beauty of geodes, these tables feature epoxy resin designs that mimic the intricate patterns and vibrant colors found in geode formations. By carefully layering and manipulating resin tints, designers can create captivating geode-inspired tabletops.
- Inlay Designs: Epoxy resin can be used to embed various materials such as crushed glass, metal shavings, or decorative elements within the wood, resulting in striking inlay designs that add depth and visual interest to the tabletop.
Incorporating epoxy resin into your furniture designs opens up a realm of creative possibilities, allowing you to experiment with colors, textures, and organic forms. By mastering epoxy resin techniques, you can infuse your custom furniture with a captivating visual allure that sets it apart as a truly unique and personalized creation.
Essential Tools and Materials for DIY Furniture Projects
Before embarking on your furniture design journey, it’s essential to equip yourself with the necessary tools and materials to ensure a smooth and successful construction process. From precision cutting to meticulous sanding, the right tools and supplies are instrumental in bringing your design to fruition with accuracy and finesse.
Essential Tools for DIY Furniture Projects
- Circular Saw or Table Saw: These power tools are essential for cutting wood to the desired dimensions and shaping the components of your furniture piece.
- Orbital Sander: An orbital sander, equipped with various grit sandpaper, is indispensable for smoothing the wood surfaces and preparing them for finishing.
- Clamps: Utilize a variety of clamps to secure wood pieces during glue-ups and assemblies, ensuring that they align perfectly and form strong joints.
- Epoxy Mixing Tools: When working with epoxy resin, precise measuring, mixing, and application tools such as mixing cups, stirring sticks, and foam brushes are essential for achieving optimal results.
Essential Materials for DIY Furniture Projects
- Quality Wood: Select premium-quality wood that suits your design and functional requirements, ensuring that it is free from defects and possesses the desired grain characteristics.
- Epoxy Resin and Hardener: Choose a high-quality, crystal-clear epoxy resin that is formulated for tabletop applications, offering excellent UV resistance and self-leveling properties.
- Finishing Products: Consider the use of wood stains, sealers, and protective finishes to enhance the natural beauty of the wood and provide long-lasting protection against wear and tear.
By assembling a comprehensive array of tools and materials, you can set the stage for a seamless and rewarding furniture-making experience. Investing in quality equipment and supplies will contribute to the precision and quality of your craftsmanship, ensuring that your custom furniture piece emerges as a testament to your dedication and attention to detail.
Design Tips for Creating Eye-Catching and Functional Pieces
Designing your own furniture presents an opportunity to infuse your surroundings with pieces that are not only visually striking but also tailored to your specific needs. To achieve this, consider the following design tips that can elevate your custom furniture projects and imbue them with both aesthetic appeal and practical functionality.
Embrace Organic Forms and Natural Elements
Incorporating organic shapes, curves, and natural elements into your furniture designs can imbue them with a sense of fluidity and harmony. Consider adding subtle contours, live edges, or intricate inlays that evoke the beauty of nature, creating a captivating visual impact.
Balance Aesthetics with Comfort and Utility
While aesthetics play a pivotal role in furniture design, it is equally important to prioritize comfort and utility. Ensure that your furniture piece not only captivates the eye but also fulfills its intended function effectively, providing ergonomic comfort and practical usability.
Harmonize Material Combinations
Experimenting with the fusion of different materials, such as wood, metal, and glass, can yield captivating juxtapositions and textural contrasts in your furniture designs. Thoughtfully combining materials can create visual interest and elevate the overall aesthetic appeal of your custom furniture.
Pay Attention to Proportions and Scale
Maintaining proper proportions and scale is essential for creating visually balanced and harmonious furniture pieces. Whether designing a large dining table or a compact side table, carefully consider the dimensions and scale in relation to the surrounding space and other furniture elements.
By integrating these design principles into your creative process, you can craft custom furniture pieces that serve as captivating focal points within your interior space while enhancing both the visual and functional aspects of your home decor.
Step-by-Step Guide to Building Your Own Epoxy Wood Table
Once you have finalized your design concept, selected the appropriate wood, and gathered the necessary tools and materials, it’s time to embark on the hands-on process of building your own epoxy wood table. Follow this step-by-step guide to bring your custom furniture design to life with precision and craftsmanship.
Step 1: Selecting and Preparing the Wood
Begin by selecting high-quality wood that aligns with your design vision and functional requirements. Mill the wood to the desired dimensions and ensure that it is properly planed, smoothed, and free from any imperfections that could affect the epoxy resin application.
Step 2: Creating the Epoxy Resin Molds
Construct a form or mold that will contain the epoxy resin as it cures. This mold should be watertight and level, ensuring that the resin maintains an even thickness throughout the tabletop.
Step 3: Mixing and Pouring Epoxy Resin
Carefully measure and mix the epoxy resin and hardener according to the manufacturer’s instructions, taking care to achieve a homogeneous mixture. Pour the resin into the prepared mold, incorporating any desired pigments, dyes, or inclusions to create stunning visual effects.
Step 4: Embedding Inlays (Optional)
If your design calls for inlays or decorative elements within the tabletop, carefully position and secure these in place before the epoxy resin cures, ensuring that they are fully encapsulated and integrated into the design.
Step 5: Assembling the Wooden Base
While the epoxy resin cures, focus on assembling the wooden base and structural components of the table. Employ precision joinery and adhesive techniques to create a stable and robust foundation for the tabletop.
Step 6: Sanding and Finishing
Once the epoxy resin has cured and the table components are assembled, proceed with sanding the tabletop to achieve a smooth, flawless finish. Apply wood stains, sealers, and protective finishes to enhance the wood’s natural beauty and safeguard it against wear and tear.
Step 7: Final Assembly and Detailing
Assemble the epoxy wood tabletop with the base, ensuring a secure and seamless fit. Pay attention to any final detailing, such as chamfering edges, adding decorative accents, or incorporating surface treatments that enhance the overall aesthetic of the table.
By diligently following these steps and exercising precision and care in each phase of the construction process, you can create an epoxy wood table that embodies your design vision and showcases the beauty of bespoke craftsmanship.
Finishing Touches: Staining, Sealing, and Caring for Your Handcrafted Furniture
Upon completing the construction of your custom epoxy wood table, it is essential to apply the finishing touches that will enhance its longevity, resilience, and visual allure. Staining, sealing, and implementing proper care practices are integral aspects of maintaining and preserving the beauty of your handcrafted furniture.
Staining the Wood
Select a high-quality wood stain that complements the natural color and grain of the wood, enhancing its visual warmth and depth. Apply the stain evenly and allow it to penetrate the wood, accentuating its unique characteristics and adding richness to the overall appearance of the table.
Sealing with Protective Finishes
Following the staining process, seal the wood with a durable protective finish that shields it from moisture, scratches, and UV exposure. Consider using polyurethane, lacquer, or epoxy-based sealers that provide robust protection while maintaining the natural sheen and texture of the wood.
Caring for Your Epoxy Wood Table
Implementing proper care practices is vital for preserving the beauty and integrity of your epoxy wood table. Avoid placing hot or wet items directly onto the table surface, use coasters and trivets for protection, and routinely clean the table with a mild, non-abrasive cleaner to maintain its luster and pristine condition.
By conscientiously attending to these finishing touches and caring for your handcrafted furniture, you can ensure that your custom epoxy wood table remains a stunning centerpiece within your space for years to come.
In conclusion, the process of designing your own furniture and crafting custom epoxy wood tables is a gratifying endeavor that allows you to express your creativity, showcase your personal style, and imbue your surroundings with bespoke pieces of functional art. By leveraging the guidance of professional custom furniture makers, exploring innovative materials and techniques, and embracing the hands-on craftsmanship of woodworking, you can bring your furniture design aspirations to fruition with confidence and distinction. As you embark on your journey to create custom furniture, remember to embrace your creativity, prioritize quality, and revel in the joy of crafting furniture that reflects your unique vision and passion for design.